Thursday, November 30, 2017

Digital Kilns a guide for the techno challenged! by Kati Mahdavi

Don’t let digital kilns scare you away! Their complex programming capabilities seem intimidating to the first time doll artist, but do not fret. They are actually a lot more user friendly than you may think. The firing process will become a lot easier once you get past the first few firings. The wonderful thing about digital kilns is their ease of use. They are able to retain segment programs of your choosing until you decide to change them. You are able to program things such as heating speed, maximum temperature in a specific segment, and the time it will hold at that segment. Most digital controllers come pre-programmed with firing schedules for a variety of different projects. If you do choose to customize your own program firing, the controller can store many different your personalized programs that you’ve formulated. With this feature, you don’t need to worry about recreating firing schedules for a project you plan on doing more than once. You can set your most commonly used firing schedule at Program 1 (PROG 1) and your second most common firing schedule at Program 2 (PROG 2).

Some symbols that you will need to know are RA (Rate per hour), TEMP (temperature you want the kiln to get to in that segment), HLD (time you would like the kiln to hold at that temperature), PROG (program), and STRT (start). Once you press start, you will hear the kiln begin to click, which is completely normal.

 Certain factors, such as brand, kiln model, age of kiln, and location all affect the way your kiln will fire. All kilns fire differently and certain temperatures may need to be adjusted, so experimenting with different firing programs is a great way to start. Try firing some “mess –up” bisque pieces for these experiment firings, just so that you can get a feel for which program yields the best results for you without ruining your good bisque in case the kiln over-fires. Sometimes firing at a true Cone 6 can be too hot and you may end up with over-fired pieces (indicated by little white dots on the porcelain). In this case, try firing to Cone 5 or Cone 4 and see if this changes the results. If your porcelain is under-fired, try adding a hold to the next firing. This should correct the under-firing. However, use holds with caution because it can easily over-fire the bisque if you accidentally enter 2 hours (02.00) instead of 20 minutes (00.20) of hold time. Experimenting at the beginning really helps the first time kiln user with establishing a good firing schedule.

 There are many advantages of digital kilns:
·       -They offer a variety of tools that provide you with more information, more accurate temperatures, and solutions   for fixing various problems that may arise in the kiln
·       -They are able to better inform you before and during the firing process
·       -Give you the freedom to go about your day instead of constantly monitoring your kiln for multiple hours
·       -More user control with setting customized programs
·       -More consistent results
·       -Peace of mind knowing that your firing will go exactly how you programmed it to, every time

The Crystal Palace: a Victorian time capsule by Jacob Hofman


  The Crystal Palace was the brainchild of Prince Albert and was designed to showcase Britain’s industrial achievements in a great exhibition to be held in London’s Hyde Park. This great exhibition was to be international including France, the United States, Russia, Egypt and Turkey. The exhibits were divided into four categories raw material, machinery, manufacturers and the fine arts. 

  The palace was designed by Sir Joseph Paxton and was a massive complex constructed mainly of glass and iron. Amazingly enough after the exhibition closed in October 1851, it was completely torn down and moved to the Penge Place estate in Sydenham to essentially become England’s first theme park!


  The rebuilt structure was over 1800 feet long and 408 feet wide. It had many interior fountains as well as lavishly landscaped inside and out. Picture a truly massive conservatory.


  The Crystal Palace became an extraordinarily successful venue hosting events that ranged from educational, musical, scientific displays, as well as cricket matches. Each of our time capsule blogs will highlight an event or an invention featured at the Crystal Palace during the Victorian era.
Wednesday, November 29, 2017

Economy household kilns just for china painting

 Your creating area is small, the dolls you want to make are small, and you are positive you just want to paint...a very small kiln may be just what you need! They can be advertised as glass kilns, PMC clay kilns, enameling kilns etc and most are priced for the budget conscious. Fair warning however these models only come with pyrometers! Basically an interior temperature gauge that you have to watch and manually turn off the kiln when it reaches temp.

Evenheat's Studio Pro clamshell design makes loading a breeze and a base model with shipping will run about $500 including shipping.  Its electrical needs are a modest 12 amps and a mere 1440 watts  means it can be plugged in almost anywhere! Firing chamber is 8x8x4.http://www.clay-king.com/kilns/evenheat_kilns/evenheat_studio_pro.html


For under $400 including both a shelf kit and shipping; Paragon's Quickfire 6 is known for its speed, miserly power consumption (1550 watts), and easy portability. It also has a surprisingly large interior of 6x6x6 inches. This makes in suitable for small scale production china painting or for rapidly firing students' dolls while they take a well deserved lunch break!The only drawback for this kiln is that you literally just lift off the top to access your doll pieces. So this does mean if you're trying to do quick firing, you will have to have a safe heatproof surface to rest the top as it is cooling off!
http://www.clay-king.com/kilns/paragon_kilns/paragon_quickfire_6.html

For $450 including shelf kit and shipping is Skutt's Firebox 8. The interior dimensions are 8 x 8 x 4 inches. And unusually in this price range the kiln comes equipped with a digital pyrometer.
http://www.clay-king.com/kilns/skutt_kilns/skutt_glass_kilns/skutt_firebox_8.html

 Blessed are the very small! While it has a minuscule firing chamber of 6x6x4, the GS Fuse box by Jen-Ken Kilns has the most modest electrical requirements of any in this group. It only draws 10amps and a mere 1200 watts. Not including shipping, the base price is $385. http://jenkenkilns.com/gs-fusebox.aspx


Monday, November 27, 2017

Yes you can still buy Seeley's Porcelain!

Seeley's Porcelain Slip


This is the first porcelain I started out with over 40 years ago! If you have not used Seeley's before, I included an excerpt from their website. The emphasis on the extended firing range is mine. If you have a kiln that runs a little on the hot side or even a little on the cold side, the fact that this porcelain is more forgiving of temperature differences can make a huge difference and the percentage of unusable pieces.


 "For over 50 years, dollmakers and porcelain artists have used Seeley’s formulas of porcelain slip to create the world’s most beautiful pieces.  Artists knew that when they started with Seeley’s porcelain slip, they started with the best.  That’s because only the finest ingredients were used, and each batch was tested to make sure it matched exacting standards.
The finest porcelain formulas, once produced by Seeley's and New York Doll Products, are now manufactured exclusively by New York Dynamic Porcelain in upstate New York. Using formulas established after extensive testing by ceramic engineers and experienced artists, we blend our slip thoroughly and then subject it to a two-step filtration process.
  • Easy to mix and pour!
  • Strong in greenware and resistant to cracking.
  • Extended firing range makes for no-fault firing.
  • Our slips fire to (Cone 6) bisque that's beautifully translucent." 

http://www.nydpshopping.com/porcelain-slip-3-liter-bags-only-for-small-orders-shipping-within-the-u-s-a/ 

Each bag costs from between $17.00 and $20.00 depending on the color. My favorite doll color French Bisque is only $17 per bag! And you can ship two bags Priority mail for $16 or three bags can be shipped together for $24 via Priority mail.

They are also happy to ship overseas with one rate for Canada, and another rate for the rest of the world. I would suggest if you are overseas to check with your local potters to see if there is a source of porcelain closer to home. Just remember you want a cone six porcelain slip as many of the potters will be more used to dealing with a higher cone ten porcelain.                              


Sunday, November 26, 2017

Firing an electric kiln with a kilnsitter

Before you use you kiln, the first thing you will need to do is adjust your sensing rod in the kiln sitter. Here are some simple adjustment checks for you to make before firing your kiln. Please note you should check this adjustment approximately every 30 firings.
1. TURN ALL SWITCHES OFF
2. INSTALL FIRING GAUGE
3. CHECK POSITION OF RELEASE CLAW AND WEIGHT TRIGGER
    a. With the firing gauge in place, swing the weight up against the guide plate. Pull the claw forward (against the slight play in the swivel/pivot assembly) and check for 1/16 th inch clearance between the inside tip of the claw and the face of the trigger as shown in Figure 2. The set screw on top of the claw should be loosened if the claw position needs to be adjusted. Retighten the set screw.
A new kiln is shipped with the firing gauge in place. Be sure to keep in a safe spot so you can reset the claw as necessary. NEVER FIRE THE KILN WITH THE FIRING GAUGE IN PLACE! If it has been removed, it should now be replaced over the sensing rod and cone supports, see Fig. 1.
   b. When the weight swings forward, the trigger should just clear the tip of the claw, as shown in Fig. 3.

The setscrew in front of the weight is used to raise or lower the trigger, as shown in Fig. 4. The setscrew must be firmly tightened or the force of repeated falling of the weight may cause the trigger to creep out of adjustment.

 4. MAKE SURE THE KILN IS LEVEL. Irregular floors can cause the kiln to be pitched out of level. An unlevel kiln will cause the kilnsitter to malfunction. The kiln must be used on a stand or on top of firebricks. The high heat required to fire porcelain means it must be kept away from combustibles.
5. CHECK THE TRAVEL OF THE SENSING ROD The firing gauge
 shown now be removed. The sensing rod is now free to travel vertically
 within the tube cavity. It should travel freely in the center of the cavity without touching the
 sides at any point, as shown
in Figures 5 and 6


6. IF NECESSARY, the sensing rod may be centered by loosening the two guide plate screws in front of the kilnsitter and moving the guide plate right or left as required, as shown in Figure 7. Be sure the guide plate screws are firmly tightened.

7. BEFORE YOUR FIRST TEST FIRE you will need to kiln wash your shelves as well as the cone supports. Kiln wash can be bought in either a dry form or premixed as a liquid. If using dry mix with a small amount of water and paint a thin coat on the kiln supports and the sensing rod. Allow to completely dry before running the kiln. This will keep cones from sticking during firing, causing an over fire. This step needs to be done before each firing. This should be done lightly; you do not want the kiln wash to accumulate. I kiln wash the shelves just once, mainly since I only fire porcelain. If I was doing glazes, I would have to keep the shelves well coated with kiln wash.
8. NEXT, YOU WILL LOAD the kiln furniture (shelves and posts) in your kiln. Start with either short ½” or 1” posts and place three or four of these on the bottom of your kiln floor. Now place a shelf on top of these posts. If your kiln is large enough you may place three or four more posts on top of the first shelf, then add your 2 nd shelf. Keep a 1” clearance from the top of the kiln.
9. TURN ALL SWITCHES OFF.
10. ON THE OUTSIDE of the kilnsitter raise the weight up against the guide plate. Use your thumb to bring down the claw and hold in place while reaching in to insert the cone between the cone supports and the sensing rod.
The diagrams show a wedge cone. There are also straight bar cones. I prefer the wedge as I can place it on the cone supports so the sensor rod is on a narrower section to slightly lower the temperature if needed.
11. THE LIMIT TIMER is used during the test firing. Turn the timer knob clockwise to number 1 ½ or 2 on the scale. Note if you are test firing to make sure that your kiln reaches a certain cone number, turn the limit timer as far as it will go and make a note of when the kilnsitter goes off. In the future 15 minutes past that time is what you should set your limit timer to prevent over firing. Note not all manual kilns will actually have a limit timer. If your kiln does feature a limit timer you have to use it, as the kiln will not turn on if you have it set to zero.
12. INSET A FINGER into the hole in the weight on the front of the kiln center and press firmly to engage the plunger until you hear it lock.
13. AS A PRACTICE RUN, I believe you should start as you mean to go on! I take a very small stilt or shelf support and prop the lid open before turning the kiln on low. If I actually had items inside the kiln, this would allow moisture to escape from the clay bodies. Even if you own a small kiln, you should prop the lid open for at least the first hour. After one hour I turn the switch to medium and leave it on medium for two hours. Next I will turn it to high until the kilnsitter automatically turns it off. Never leave your kiln running unattended.
14. ALLOW THE KILN to cool completely before opening. This usually takes the same number of hours that it took for your kiln to fire a load. Now it is time to inspect the bent cone in the kilnsitter to make sure you have adjusted all the mechanisms correctly.
In figure 9 you will see that the cone has been bent almost at a 90° angle, this is the correct bend. However if the cone is tightly folded as shown in the overfired illustration, you will need to slow down the rate at which your kiln reaches the cone temperature. Just leave it on low for an extra half-hour, and on medium for a next to our before turning it to high. The opposite problem is under firing in which the cone just barely slumps enough to trigger the kilnsitter. In this case I would try readjusting the weight on the front of the kilnsitter so that the claw has a little bit less clearance. This will result in the cone having to bend in the more correct position before triggering the kiln to turn off. I always run a test fire when I get a new kiln or if I have just replaced the elements in an older kiln. In both of these instances the kiln will run a trifle hot as the elements are at their peak efficiency. So the ramping up time may very well be needed to be slowed down by running the kiln longer at low and medium before turning to high.

Friday, November 24, 2017

Wigging tutorial

 Georgia porcelain dollhouse doll by Stacy Hofman

Wigging for Christmas Ornament

          ..........by Stacy Hofman


If you are making your Georgia as a
Christmas ornament, take a piece of
metallic cord, fold over in half, tie the ends
together in a double knot. Run a section of
beading wire through the top of the head down
through the torso and fasten to the metallic cord .
Use the wire to pull the cord through the top of
the head until the knot stops its progress.
Secure with a dab of glue.

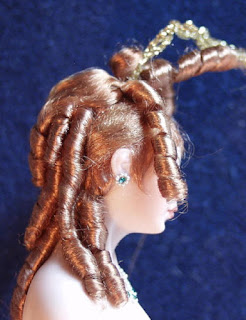
For the ornament, I decided on highly stylized bangs. I
desired a wispy effect that would allow a lot of the
forehead to show through. For this doll I used the
synthetic fiber viscose. You will need an assortment of        
knitting needles in various small sizes, viscose, a
small bowl of warm water, scissors, and a cookie sheet
lined with paper towels. Separate your viscose into
segments a scant 1/4 inch across and 2 to 3 inches
long, dip in the water and then wrap around the knitting needles to make long sausage curls.
As you wrap the needles lay them
out on the cookie sheet and afterwards
cook in a slow oven 250 degrees for 30
minutes. Remove from the oven and set
them aside to cool completely before
gently sliding the curls off the
needles. Take one of the largest curls
and cut off a ½"
section..............unfurl it and
spread it apart and glue these curved
wisps as shown in the photo. After the
glue has dried, take a small paintbrush
and dip in starch water ( one cup water with 1/4 liquid
starch ) and dampen the bangs then stroke into a
stylized fashion with the point of a needle. Set aside to dry.

Take a selection of sausage curls
and unfurling the top of each one,
glue one after another, with the
flattened section glued to the head
from the nape up past the ears. Be
sure to glue down the curled
sections to the porcelain down the
back. As an ornament. It will
receive a lot of
handling, the wig
should be firmly
glued in place.


 In the second photo observe the excess at the top has been cut off. 


Unfurl two curls then spread them apart. Glue one
end to just the side of the center part line. Then fold
over and glue down all the way around to the back of
the head. Repeat with the second curl to form the other
side of the hair part. Remember as you bring the
sections of hair down the sides of the head be sure to
cover the top glue level of the lower curls. At the
place where the hair ends in the back of the head cut
level with the scalp. As the ends will be covered with
more curls, it is not essential that it presents a
finished appearance . Photo of the center part swept back
along the sides and ending center
back.


         Take some viscose odds and ends from
         your prep work and roll together in
         the palm of your hand to make a
         small hair "rat" and glue to the top
         of the head. As this rat will be
         completely cover it does not have to
         be extremely neat in appearance.


Glue a second
line of sausage
curls to the back
of the doll's
head right below
the hair "rat".


      Take the smallest of your sausage curls
       and glue one end down to the back of
       the hair "rat". Uncurl the center
       section and glue over the top of the
       "rat" . Continue to glue curls in the
       same fashion until the rat is
       completely covered.


     Cut the end
     of the curls
     in front of
     the "rat" and
     glue the
     curls down as
     shown in the
     photos.


Next you’ll
want to add
florals to her hair. I start by gluing on
clumps of landscape
foam available at your local
model train
shop. I then add leaves; for both of these I prefer Tacky glue.

It is extremely helpful to glue what I like to refer to as a filler flower as your next step. My personal favorite is glycerin dried pepper grass...in some areas it is referred to as candy tuft. The filler flower gives a nice cushion for the other flowers to nestle into.


           If you’re going to use
           flowers made out of polymer
           clay they should be attached
           with Zap-a-gap or another
           type of Krazy glue. You can
           also substitute silk ribbon
           roses or even larger
           varieties of dried flowers.


            Because Georgia in this
            instance as being used as a
            Christmas ornament, I
            thought it might be a good
            idea to add some metallic
            beads so she would capture
            and reflect the lights on
            the tree.

            These are silver no hole
            metallic beads which are
            available through many craft
            stores and are usually found
            among the stamping supplies.


To apply the no hole beads
simply take clear fingernail polish and put
a small puddle out on a glass surface. Dip a
toothpick in the fingernail polish and then                        
into a small container of beads. Roll the beads
around in the fingernail polish on the glass
surface and while they’re still wet randomly apply
them to the florals. Set aside to dry.


The end!