Wigging for Christmas Ornament
..........by Stacy Hofman
If you are making your Georgia as a
Christmas ornament, take a piece of
metallic cord, fold over in half, tie the ends
together in a double knot. Run a section of
beading wire through the top of the head down
through the torso and fasten to the metallic cord .
Use the wire to pull the cord through the top of
the head until the knot stops its progress.
Secure with a dab of glue.
together in a double knot. Run a section of
beading wire through the top of the head down
through the torso and fasten to the metallic cord .
Use the wire to pull the cord through the top of
the head until the knot stops its progress.
Secure with a dab of glue.
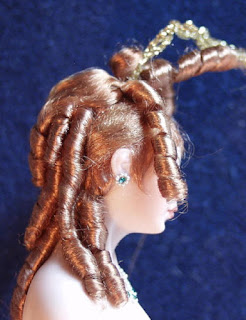
For the ornament, I decided on highly stylized bangs. I
desired a wispy effect that would allow a lot of the
forehead to show through. For this doll I used the
synthetic fiber viscose. You will need an assortment of
knitting needles in various small sizes, viscose, a
small bowl of warm water, scissors, and a cookie sheet
lined with paper towels. Separate your viscose into
segments a scant 1/4 inch across and 2 to 3 inches
long, dip in the water and then wrap around the knitting needles to make long sausage curls.
 As you wrap the needles lay them
 As you wrap the needles lay them
out on the cookie sheet and afterwards
cook in a slow oven 250 degrees for 30
minutes. Remove from the oven and set
them aside to cool completely before
gently sliding the curls off the
needles. Take one of the largest curls
and cut off a ½"
section..............unfurl it and
spread it apart and glue these curved
wisps as shown in the photo. After the
glue has dried, take a small paintbrush
and dip in starch water ( one cup water with 1/4 liquid
starch ) and dampen the bangs then stroke into a
stylized fashion with the point of a needle. Set aside to dry.
Take a selection of sausage curls
and unfurling the top of each one,
glue one after another, with the
flattened section glued to the head
from the nape up past the ears. Be
sure to glue down the curled
sections to the porcelain down the
back. As an ornament. It will
receive a lot of
should be firmly
glued in place.
In the second photo observe the excess at the top has been cut off.
Unfurl two curls then spread them apart. Glue one
end to just the side of the center part line. Then fold
over and glue down all the way around to the back of
the head. Repeat with the second curl to form the other
side of the hair part. Remember as you bring the
sections of hair down the sides of the head be sure to
cover the top glue level of the lower curls. At the
place where the hair ends in the back of the head cut
level with the scalp. As the ends will be covered with
more curls, it is not essential that it presents a
Take some viscose odds and ends from
your prep work and roll together in
the palm of your hand to make a
small hair "rat" and glue to the top
of the head. As this rat will be
completely cover it does not have to
be extremely neat in appearance.
Glue a second
line of sausage
curls to the back
of the doll's
head right below
the hair "rat".
Take the smallest of your sausage curls
and glue one end down to the back of
the hair "rat". Uncurl the center
section and glue over the top of the
"rat" . Continue to glue curls in the
same fashion until the rat is
completely covered.
want to add
florals to her hair. I start by gluing on
clumps of landscape
foam available at your local
model train
shop. I then add leaves; for both of these I prefer Tacky glue.
It is extremely helpful to glue what I like to refer to as a filler flower as your next step. My personal favorite is glycerin dried pepper grass...in some areas it is referred to as candy tuft. The filler flower gives a nice cushion for the other flowers to nestle into.
If you’re going to use
flowers made out of polymer
clay they should be attached
with Zap-a-gap or another
type of Krazy glue. You can
also substitute silk ribbon
roses or even larger
varieties of dried flowers.
Because Georgia in this
instance as being used as a
Christmas ornament, I
thought it might be a good
idea to add some metallic
beads so she would capture
and reflect the lights on
the tree.
These are silver no hole
metallic beads which are
available through many craft
stores and are usually found
among the stamping supplies.
To apply the no hole beads
simply take clear fingernail polish and put
a small puddle out on a glass surface. Dip a
toothpick in the fingernail polish and then
into a small container of beads. Roll the beads
around in the fingernail polish on the glass
surface and while they’re still wet randomly apply
them to the florals. Set aside to dry.


Love this tutorial and Georgia mold! I wish you would make more molds for sale asap.
ReplyDeleteMini hugs,
Sandra